Setup and Installation Ubuntu Development Environment with VMWare
In this posting I'll describe my steps and experiences during the setup of a development environment for Java and PHP on Ubuntu 7.04 using VMWare Workstation 6.02. I expected it to go a lot smoother than it actually did. With this post I hope I might save somebody some time because of de steps described here :-)
The desired final setup:
- HP Pavilion DV6000 laptop with 2G RAM, 1.6Ghz, 110G HD, AMD 64b.
- VMWare Workstation 6.02.
- Ubuntu 7.04 (Feisty Fawn).
- I never used Ubuntu before.
- I wanted a clean VMWare image with Java 5, PHP 5, Eclipse 3.3, MySQL, Tomcat and SVN installed.
- Gnome desktop.
I suggest you read all the steps first before starting, because I'll also list the trial/error I came across...
This first post is purely about the Ubuntu and VMWare setup. In a next post I'll be describing the development tools installation and setup (Eclipse, Java etc.)
Installation
Step 01 - Downloaded Ubuntu 7.04Step 02 - Downloaded VMWare Workstation 6 (v6.02 to be exact)
Step 03 - Installed VMWare WS, using the trial license key. I already had several VMWare 5.5 images and they all migrated successfully. Great!
Step 04 - Created a new Virtual Machine with 16G of diskspace. Didn't select "Allocate now", thus letting it grow, so not directly reserving 16G of diskspace.
Step 05 - Selected Ubuntu 64-bit.
Step 06 - Used Bridged networking (gives you least setup-fuss)
Step 07 - Since I didn't want to burn a CD from the downloaded Ubuntu .iso image, I just let the CD-drive of the Virtual Machine point to the .iso image: Select Edit virtual machine settings. Select the CDROM. Select Use ISO image. Browse to the path where you downloaded the Ubuntu 7.04 image and select the file. After installation you have to undo this setting of course. See here for full instructions.
Step 08 - Powered on the VM. Ubuntu install is started.
Step 09 - I selected a hostname
Step 10 - It picked UK timezone. You can change it later if you want/need to.
Step 11 - I let it detect the keyboard itself. It did it correctly.
Step 12 - Partitioning setup:
My first idea was to do a "full production/very flexible" partitioning like this:

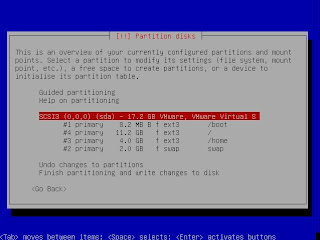
But that I considered too complex for my development server setup. So I used this partitioning:

Note that in the end (see below) I set the /boot to 50M (instead of the shown 8.2M) and that for /boot I set the Bootable flag to true.
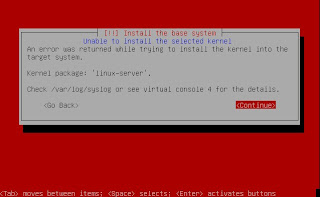
Step 13 - After partitioning, the install process wanted to install the software. There I got stuck a bit. I got some generic errors, saying I should look into /var/log/syslog. I thought I couldn't do that because I hadn't installed anything, so no OS yet, so no filesystem yet. So I tried installing other versions (non 64-bit etc) with the same partitioning setup (8.2M for boot). But everytime I got a similar error. An example of this error:

Then I saw I could see the syslog file by opening a very basic prompt (either after restarting or after cancelling the error; can't remember anymore :-(
In that logfile it showed it was running out of diskspace. So it turned out the 8.2M for /boot was too little! So I set it to 50M and the installation all worked like a charm. Note that at this point I also tried Ubuntu 7.10. It still did not work even after a bootdisk of 50M: it just hang when trying to extract/install libntfs or something, probably the Samba server..., so I gave up on that one at this point. Note that 7.04 did ask me for less additional software to install (e.g. no SAMBA server).
Gnome, VMWare Tools Installation
Step 14 - So now I had a terminal with login prompt. By default, Ubuntu does not let you login as root. There's even no password. You can set one with "sudo passwd root" after logging in as the admin user, which you specified during installation. Note that the first password you get prompted when issuing "sudo" for, is the password of the user you're logged in as! Thus at this point the non-admin user you specified during the installation process.Step 15 - So the basics are setup now: a crips clean Ubuntu 7.04 installation. A good point to make a VMWare snapshot so I did.
Step 16 - Now I needed Gnome desktop, thus I did the following steps. I actually wanted to issue startX myself but in the end, when I got all the things mentioned in the next steps, Gnome started by itself during booting :-( I basically followed the steps mentioned here.
Substep 16a - sudo apt-get install ubuntu-desktop
Substep 16b - sudo apt-get install gdm
Substep 16c - sudo /etc/init.d/gdm start
Substep 16d - sudo dpkg-reconfigure xserver-xorg
BUT I found out that it does indeed download OpenOffice etc, which I didn't want. So I rolled back to my previous snapshot (that's what they are for!! I'm lovin' it! :-)
So I did this as mentioned in the thread to only install the minimal:
Substep 16aa - sudo apt-get update
Substep 16bb - sudo apt-get install gnome-core
But then startX didn't work, it gave errors like it couldn't find XServer. So I did this:
Substep 16aaa - sudo apt-get install x-window-system-core
Substep 16bbb - sudo apt-get install xserver-xorg
Substep 16ccc - I did NOT do : sudo apt-get install gnome-desktop-environment
Step 17 - Used as resolutions: 1280x800, 1024x768, 800x600, 640x480. I actually forgot I have 1280x800, which got met unfocused letters. I manually added it in /etc/X11/xorg.conf, as mentioned here. That worked, all texts were in focus again.
Step 18 - Then I did the VMWare Tools installation:
Substep 18a - Installed VMWare tools on guest via VM engine tab: Install VMWare Tools as is mentioned in ws6_manual.pdf p125-p128 and further.
Substep 18b - Then mounted the cdrom with: mount /dev/cdrom /media/cdrom0
Substep 18c - cd /tmp
Substep 18d - Unzip and tar the VMWare tools *.gz file
Substep 18e - umount /dev/cdrom
Substep 18f - cd to vmware-tools-distrib
Substep 18g - ./vmware-config-tools.pl
Substep 18h - etc. That all worked fine.
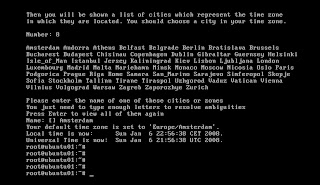
Step 19 - The time used by the OS was still not ok (remember I selected UK timezone). I even set the VMWare time of the guest (Ubuntu) to sync with the host, but it didn't change it. Finally I figured out on Ubuntu you can use tzconfig (got that from here. Yup, it asks you a couple of questions and then you're set! See also this screenshot:

Step 20 - Then I found out switching to another user in the Gnome desktop didn't work, it gave an error like this: "Couldnot run command gdmflexiserver."
Substep 20a - So I did do the command 'sudo apt-get install gnome-desktop-environment'. The desktop now looked a bit better, slicker and got some more Administration menu items like System log etc. Also now games, movie layer, evolution (email). And now Switch user gives: "GDM (Gnome display manager) is not running". After logout at least now the font-size is back to normal in terminal mode (it used to get very large).
Substep 20b - I just gave up on this part for the time being. I did notice that the desktop is now started automatically after reboot. Not really what I wanted but too much hassle to try to fix it.
Substep 20c - So the end result was:

Additional repositories
Step 21 - Usually you don't only want the default installed repositories that apt-get uses. Thus you can add more via this:Substep 21a - Selected the ones I wanted on this website. I selected: default ones, amd64bit, Ubuntu backports project.
Substep 21b - Clicked Create Sources list. It generates a repositories file in the correct format, which I put in sources.list in the steps below.
Substep 21c - Backed up my previous sources.list file: sudo mv /etc/apt/sources.list /etc/apt/sources.list_orig
Substep 21d - Pasted the generated list in the file: sudo vi /etc/apt/sources.list
Substep 21e - Told apt-get you updated the sources: sudo apt-get update
Outstanding issues
Step 22 - Some other issues I still have:Substep 22a - When I do System/Logout, it seems to kill Firefox the hard way (instead of nicely killing), since after starting X again, it says Firefox exited unexpectedly...
Substep 22b - It also turns out you can't save your session in the second workspace; you'd have to use Devil's Pie. Or what you could do as intermediate solution: start all in the first workspace, drag the ones you want to the other workspace(s) after startup... You have to drag it between the workspaces, you can't drag it onto the "big" screen.
Substep 22c - The default font was not looking great. You can quite easily change it, but I don't remember the URL where I read how to do it... :-(
So, that concludes this first installation and setup post. In a next post I'll continue on installing Eclipse 3.3 (Europa) and PDT related plugins (PHP support in Eclipse w/o completely installing PDT) and Java.
 Digg
Digg

No comments:
Post a Comment